Upcycling Cat Scratching Posts
Cat activity trees and scratching posts aren't always attractive - especially as they age. Have you ever felt that you needed a bit more colour and sparkle in your life? Or your cats life? Then this is for you.
- There are affiliate links on this page. This means that I may make some money from it. Don't worry it won't cost you any extra.
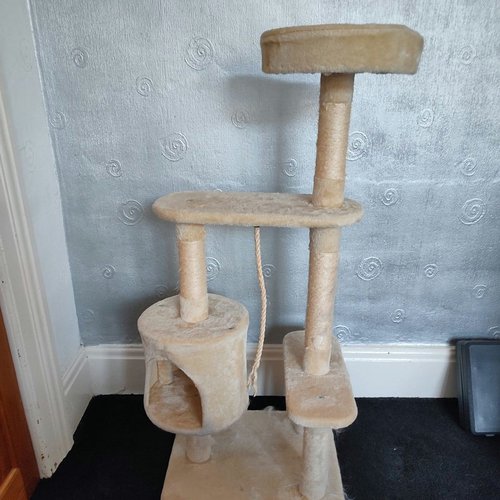
Recently I decided to redecorate my living room. The cat activity trees and scratching posts were looking tired and I wanted to update them as well. The cat trees were mostly in good condition, except the fabric looked worn and dirty, even after cleaning.
So I started thinking about how I could make them look nice as well as more comfortable for the cats. Then I went off on one trying to thinking about how I could make them ‘wild’. I have a habit of doing this with decorating, much to my family's dismay.
Recovering the Scratching Tree Platforms
To start with, I ripped the material off and removed all of the staples from the platforms and beds. The chipboard/wood itself was in good condition apart from one corner a the base. (This is probably due to hitting it with the hoover.)
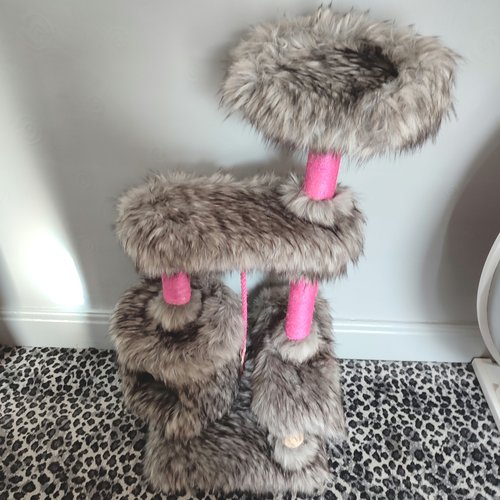
I then recovered the platforms with a layer of foam and then the fluffy material. I held the material in place with hot melt glue and then used a staple gun to attach the material fully. Where the fur overlapped at the seam/edge, I trimmed the fluff so it was less bulky and fit closer.
The flat, oblong platforms were easy to cover. The circle beds were more complicated to cover but I cut the shape and used a lot of hot melt glue to hold it in place.
When putting it all back together at the end, I found I needed to cut a hole in the material on the platforms where the post attached. This was so I could get the post to sit flush against the platform for a tight fit.
With the second tree, I decided that the foam was excessive so didn’t bother to use it. This was because the fluffy material was very thick.
Having the long fluff, meant it covered all the staples and I can't see where I've made a mess. Next time I would make more careful notes about which way the platforms go as some of the fluff is running in different directions. You can't really tell but I know it's not perfect.
Painting the Sisal Rope
I saw on the internet that I could purchase coloured sisal rope and thought that this would be a good idea. But when trying to work out how much I would need, I decided that it was expensive for something that didn’t need doing really. Plus it would be a lot of work.
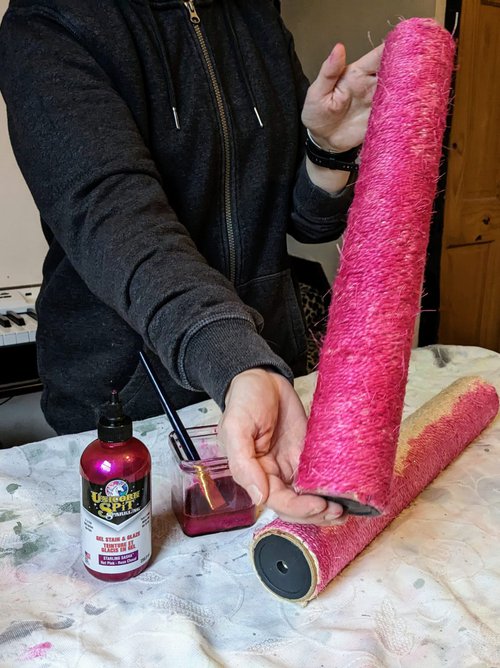
After recovering the scratching tree platforms, I continued thinking about this and came across this product called Unicorn Spit. It can be used to stain natural, untreated products.
Unicorn Spit comes in a range of colours including purple, blue, red, yellow and green. I usually go for purple, but this pink was so pretty I couldn’t resist. (Reminded me of Hello Kitty pink.) You can use it as it is or dilute it. Not only is it pretty, it has glitter in it too!
I diluted the Unicorn Spit, it so it would cover the twine more easily. I guessed how much I needed to cover the surface and diluted enough for the bit I was doing. It wasn’t scientific at all. I did try to make sure I had enough paint for the area I was going to do. (The more it is diluted, the lighter the finish.)
With it being diluted, it did flick well so would recommend covering the floor/surrounding areas. I took the first tree outside and used dust sheets. (I think it would be easier to paint it with the activity tree in pieces.) The cats were very interested in what I was doing but I tried to keep them away from the wet paint.
The bottle isn’t big but it does go a long way. Obviously being used diluted helps. The 236ml bottle covered a couple of coats on 4 little shelves, plus a couple of coats on 14 scratching post parts. I’ve got a tiny bit left in the bottle to touch up if required.
I tried the Unicorn Spit on one cat tree first to check that the cats weren’t put off by it. They had a sniff as it was new, but then used it as normal. After that, I decided to paint all of the other cat trees in the living room to match. Each day the kiddies came home, another bit was pink.
Stylish Scratching Posts and Cat Trees
Even though the cats loved the material when it was on the floor and in progress, it took them a while to get used to it on the trees. I think next time, I wouldn’t use such thick fluffy material. The material I used is very long haired! I think the short haired fluffy material would be best for a project like this. However, now it has been place for over a month, I find more of the platforms are being used and even the enclosed bed part.
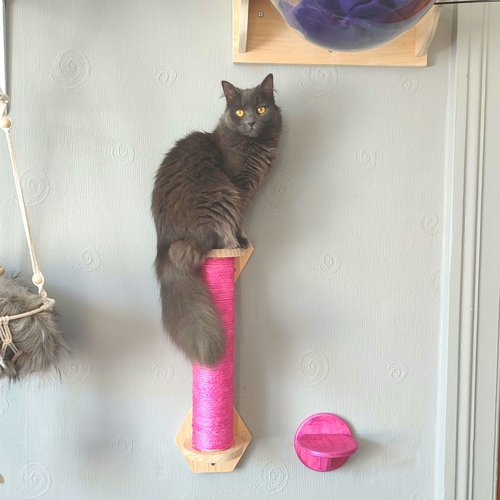
The cats use one post in particular to scratch, even since it's been painted. It still looks fine and I know if it does look tatty I can repaint it.
If I was going to do it again, I would paint a first coat of one very diluted product so it got into all of the parts of the sisal rope. Then do a second coat, which is diluted but not as much.
It does perk the whole place up. I’m not a beige person so the twine with the glitter makes me smile. My family doesn’t agree with me. No accounting for taste. :)
I’m really pleased I took the chance to try this. I love the end result! It is certainly different and I’ve not seen anything like it before. When I get time, I’m going to do the other trees in our house. I’m planning on trying different colours and materials so will let you know how it works out. And more importantly, what the cats think.

*Tried, tested and approved by Fermi, Bean and Daisy-Bear. They said it's the 'cats whiskers'.
*** There are affiliate links on this page. (Any link to Unicorn Spit is an affiliate link.) This means that I may make some money from it. Don't worry it won't cost you any extra..